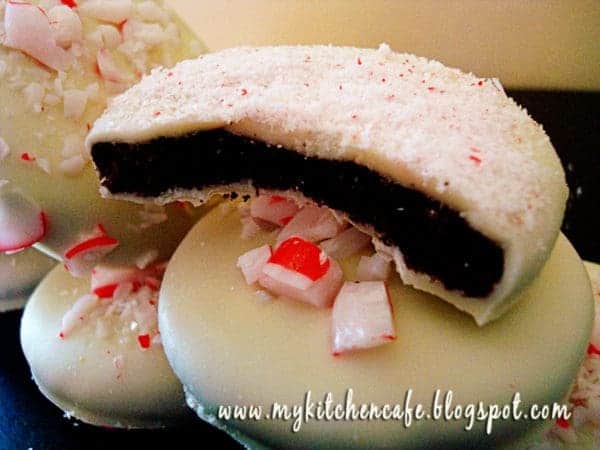
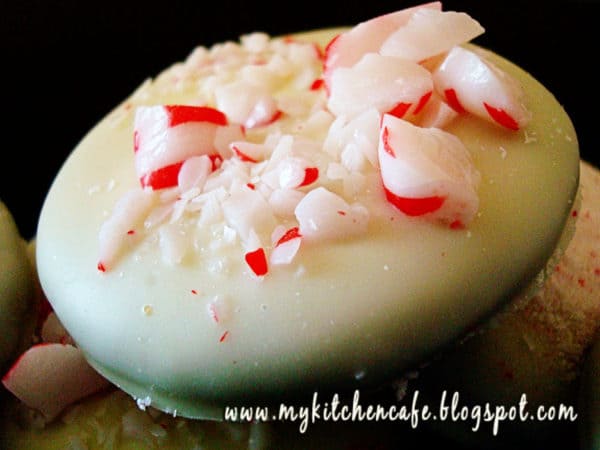
Chocolate Peppermint Cookies
A perfect, delicious, and stunning holiday cookie, these chocolate peppermint cookies are sure to wow family and friends!
**An updated post/pictures of these cookies is located HERE!**
I spied these cookies in the December issue of Martha Stewart Living and new I had to make them for two reasons: 1) they were so stinkin’ cute, I had no choice and 2) I absolutely love the Girl Scout Thin Mint cookies and wanted to try my hand at a homemade version.
Am I ever glad I tried! I was a little nervous thinking about what a disaster it would be to dip the cookies once they were baked, but that was the easiest (and funnest!) part.
My rowdy little boys helped work out their aggression and crush the peppermint candies and it quickly became a family project.
Not only were these really pretty but they were absolutely and phenomenally delicious.
My husband couldn’t believe how good they tasted (he thought they were all about the looks) and I barely got any out the door to give to friends.
Like most Martha Stewart recipes, the instructions are a tad fussy and it takes some time to chill/freeze all the different components of the dough, but in the end, it was worth it.
A perfect holiday cookie in my book! Next time I am definitely dipping at least half in dark chocolate to see how that turns out – and I’m sure NONE will make it out the door if they are half as good as I imagine.
Chocolate Peppermint Cookies
Ingredients
- 1 cup (142 g) all-purpose flour, plus more for surface
- ½ cup (43 g) unsweetened Dutch-process cocoa powder
- ½ teaspoon baking soda
- ½ teaspoon baking powder
- ½ teaspoon salt
- 5 tablespoons (70 g) butter, softened
- ¾ cup (159 g) sugar
- 1 large egg
- 1 large egg yolk
- ¾ teaspoon pure peppermint extract
- 8 large candy canes or 30 peppermint candies, crushed
- 2 pounds white chocolate, coarsely chopped
Instructions
- Preheat oven to 325 degrees. Whisk flour, cocoa powder, baking soda, baking powder, and salt in a bowl. In another bowl, beat butter and sugar with a mixer on medium-high speed for 1 minute. Reduce speed to medium-low, and add egg, then yolk, beating well after each addition. Beat in peppermint extract. Slowly add flour mixture, and beat until just incorporated. Shape dough into 2 disks, wrap each in plastic, and refrigerate until firm, at least 1 hour (or up to 2 days).
- Roll out 1 disk of dough on a lightly floured surface to 1/8-inch thickness. Freeze until firm, about 15 minutes. Using a 2-inch round cutter, cut out circles, and place 1 inch apart on parchment-lined baking sheets. Roll and cut scraps once. Freeze cookies until firm, about 15 minutes. Repeat with remaining disk.
- Bake until cookies are dry to the touch, about 12 minutes. Transfer parchment, with cookies, to wire racks, and let cool. (Undecorated cookies will keep, covered, for up to 3 days.)
- Sift crushed candy, and separate larger pieces from dust, reserving both. Melt chocolate in a heatproof bowl in the microwave (don’t overheat or the chocolate/almond bark will sieze!). Dunk cookies into melted chocolate. Using a fork, press lightly on the cookie until completely submerged in the chocolate. Pick up the cookie with the fork, let excess chocolate drip off, and gently scrape bottom against edge of bowl. Place on parchment-lined baking sheets, and sprinkle 1/4 teaspoon of either candy pieces or dust on top. Repeat, sprinkling half the cookies with pieces and the rest with dust. Refrigerate until set, up to 3 hours.
Notes
Recommended Products

Recipe Source: adapted slightly from Martha Stewart Living


Can I use 30 round Starlight mint candies? Thank you! I have such a taste for these cookies!!
Yep!
I edit to above: I rolled the chilled dough into a log and then sliced and baked. Easy peasy.
100 times easier: just made these for the second time. This time I chilled the dough and then sliced it. Lots easier than cutouts.
Well, I had to give a negative review on the cherry shortbread, but these were pretty good. I did not put peppermint in the cookie, but used dark chocolate to dip and added quite a bit of peppermint to that, followed by the chopped candy canes. Although they are not quite like the Girl Scout cookies, they were pretty good and festive. Personally, I detest white chocolate (it’s not really chocolate) as it is way too sweet and to me has a cheap candy taste, but the dark chocolate really worked well. The cookies tasted pretty darn good. Thanks for the recipe.
Amy Jo – you freeze the dough each time before you cut it once it’s been rolled out. The reason the recipe states two times to “freeze until firm” is because the second time it is referring to the scraps that were rerolled out. Make sense?
Do you freeze them two times, or is that an error, and you only freeze once after they’ve been cut out?
Yes, I will try and take my chances. Thanks for getting back to me! The tortellini bake was a huge hit!! The girls were never so quiet! I am already dreaming of when I can make it again. I added a little minced garlic with the chicken and mushroom mixture. This was heavenly!!
Hi Patricia – good luck with your daughter’s wedding! I hope the tortellini bake worked out ok. Yes, I think the chocolate peppermint cookies would freeze ok. The only thing I’d watch (and maybe test) is when they are pulled out of the freezer (if they have already been dipped), they may have the potential to crack as they come to room temperature. I’ve had that happened with dipped truffles that I’ve frozen. But sometimes it isn’t an issue. Hope that helps a little. Let me know if you try them!
Leave it to your blog to constantly re-inspire me to cook! I got married in my very early twenties so after 22 years of dinner making I can fall into a real slump! However after the dog woke me up at 5am and I could not get back to sleep – I decided to peruse your recipes very carefully. My daughter is getting married on Dec. 23rd and is having her bridal party over for dinner tonight. She loves the chicken tortellini bake from our local Italian restaurant and here was a great version on your site. So it is printed and I am headed to the store. Also the chocolate peppermint cookies are going to be a great addition to my cookie collection this year. I was thinking instead of candy canes, I might drizzle them with red chocolate (from the candy aisle at the craft store)Do you think they would freeze well?
Another great recipe from you. I made these yesterday and they tasted wonderful. Do you store them in refrigerator or at room temperature? Also, can you make these a couple of days before serving?
Anonymous – so glad you liked these cookies, they are some of my favorites! I store them at room temperature and I think they would be fine for at least 2-3 days beforehand especially well covered so they don’t get soft (especially in a humid climate).
Hi, Melanie. I came across your blog in looking for some advice on these cookies. I made them this year and the actual cookie came out great, but the white chocolate (I used Guittard white chocolate chips) was not liquid enough to dunk and have them look smooth like yours are in the picture. Do you have any tips? Thanks!
Melissa – your comment makes me realize I should add a tip to the recipe in that white chocolate chips don’t melt as smoothly as the bars of baking white chocolate or even almond bark. White chocolate chips are great in cookies and bars but because more solids are added to them to get them into the “chip shape” they don’t melt smoothly and I always avoid using white chocolate chips for coating truffles, these cookies, etc. Your best bet next time you make these is to use white chocolate baking squares or almond bark. I hope that helps!!
These were amaazzinng!
I was a bit intimidated because I don’t usually try such complex recipes but I was surprised they turned out great!!
I used semi-sweet chocolate chips instead of the white chocolate – and I melted them in a pan on the oven instead on LOW heat. It worked wonderfully. Mine look almost 😉 as pretty as yours.
I don’t like mint chocolate usually but these were really good – especially with milk.
Excellent instructions and I can’t wait to try more stuff off of your site! That Naan bread is looking pretttyy good..
Thanks so much!
I’m attaching a link to the picture of my cookies so you can see what they look like with the darker chocolate:
http://www.flickr.com/photos/38777571@N05/4257847994/
http://www.flickr.com/photos/38777571@N05/4257845262/
Kaitlyn – wow, your cookies look so great! I love them covered in the chocolate and with the crushed green and red mints on top…they look so beautiful and festive. Thanks for sharing the links. I’m glad you liked the recipe!
You are so ambitious! I have the Martha Stewart magazine too! I ahve been looking at the beautiful cookies, but haven’t attempted any yet! YOurs look just awesome! WOw!
Kimberly – I LOVE your idea for the Valentine’s idea on these cookies. Do you care if I steal it and use it, too? I can’t imagine how cute that would be! I’m so glad you liked this recipe and the great thing (which you’ve hit on) is that it is so versatile when it comes to decorating.
Wow those look amazing!!!
these are beautiful!
Martha can be a pain but these cookies look like they are well worth any effort! I can’t wait to make them!
Wow… No words for these cookies. I am going to visit family for the holidays, and I made these – some little and some bigger that I drizzled in milk chocolate over the white chocolate and candy canes. These are definitely diet busters 🙂 Thanks so much… again!
I made these (or what is left of them).. Did anyone have problems with the cookie being too soft? I used a pampered chef stone… maybe didn’t get baked enough…. Still yummy.
Britta – wow! I love the idea of drizzling chocolate over the dipped/candy coated cookie. I bet it looks beautiful! Sorry for the diet buster…but they are just so worth it, don’t you think?
What a great cookie! They are so pretty and festive! Plus anything with peppermint is on my favorite list!
Amy – I’ve never used a stone for baking cookies so I’m not sure if that would contribute to them being too soft. Next time maybe increase the baking time by a minute and see if that firms them up a bit. Anyway, thanks for checking in and I’m glad you still enjoyed the cookies – soft or not!
Hi, I just found your lovely blog, and wanted to say the cookies look amazing!! So cute and very festive! thank you for the recipe, see you again soonPrisiclla x
I saw those in the MS mag too! Yours look fabulous!
I have been looking for a good homemade version of the thin mints. These cookies do look way too cute!
Hi! I was referred to your fantastic blog by my friend (and yours) Amanda S…. I love your blog so much, I’ve even listed it as a favorite on MY blog, lovelandavenue dot blogspot dot com! I HAVE to try these cookies! Thanks for sharing all these great recipes. I’ve tasted your bread recipe that Amanda made one day and cannot wait to make some/many other great meals. I love to cook also. You do a fantastic job on this blog. 🙂Sally
Wow, I thought you BOUGHT those cookies. They look so professional!
These cookies look delicious!! I love how holiday festive they look. Bookmarked to make this season!
Oh wow! Those not only look phenomenal but sound just as amazing! I LOVE peppermint and chocolate paired together and these sound just awesome!
Thanks everyone for the nice comments!Frieda – these are definitely a more crisp cookie – which helps with the dunk in the chocolate.
O.K. You’ve got me hooked! The pictures alone did the trick…are these crispy dunkin’ type cookies or are they soft? Can’t wait to try them!
Jamy – I’ve wanted to dip them in chocolate so I’m glad you tried it and liked it. Especially, I am glad your husband was so impressed! Email me anytime with questions, I probably can’t answer them all but I don’t mind trying!
I have been looking for a good homemade version of the thin mints. These cookies do look way too cute!
It is happy to see your posting. Yes really informative article. I will tell this information again to my friend, oh yes I suggest you to check my blog on< HREF="http://top-chocolate.blogspot.com/" REL="nofollow">Chocolate Cake<> , I hope the article on my blog will be usefull for you… and we can share each other. thank you… 😉
Im making those for an exchange, Im very excited about it!!!
These were absolutely delicious, just as you hoped! I’m sure glad you found some to send our way!
OH MY GOSH! Those look SOOOOO good! And they are SO beautiful! They look like you bought them from a gourmet shop! I LOVE this idea! Starred!
These look great, very festive!
These turned out incredibly beautiful. And tasty! I had a rough time with the white choc. not staying liquid long enough to dip the cookies! If I would have had the vanilla bark I would have tried combining like you did. I actually used the rest of my choc. bark and was VERY pleased! I think I even like them better than the white choc. They’re not as pretty, but they taste amazing. Even MY husband was impressed with the presentation of the cookies (and he’s not easily impressed!) Thanks again for answering all my questions.
Oooh these ARE cute! And that is so bizarre that their amount was nearly double what the recipe actually made!
melanie. there are full of win. win, win, and win. i love mint, i love chocolate, i love white chocolate, i love cuteness, and i love family projects. so i guess technically, these are win, win, win, win, and win. 🙂
mmmm.. with dark chocolate.. YUMMM! I havent been in the baking mood lately.. but these my push me over the edge! They would make cute little office gifts to put a few in a cute little cellophane bag and tie with a cute ribbon!!
Melanie, steal way! I am sure they will be super cute and yummy too! Another idea… for bridal showers I always am elected to make chocolate covered oreos (to look like little tuxedos) I am sure you can do that with these as well 🙂 YUMMY and SOOOO nice looking. Use white and dark chocolate for them to look the most like tuxedos!
Thanks so much for sharing this great recipe! I made the cookies and took them to a cookie exchange they were amazing! I am making more today for my sons school party 🙂For the white chocolate I went to AC Moore and purchased the Melt & Mold Chocolate it melts so nicely in the microwave and you can melt enough to do a dozen at a time so the chocolate doesn’t get hard! For Valentines Day I am going to dip them in Dark Chocolate and put a Red Chocolate Heart on top!