Whole Wheat Pizza Pull Apart Rolls {With a Simple Step-by-Step Tutorial}
A delicious and healthy recipe for whole wheat pizza pull apart rolls complete with pictures on how to make the pizza rolls!
I have a thing for wrapping things up in bread. And for a long, long time, I’ve specifically wanted an amazing, knock-your-socks-off recipe for pizza rolls.
Dozens of methods and variations later and these are truly the best pizza pull apart rolls on the planet.
Not too saucy or soggy, deliciously cheesy without being overboard (meaning no major cheese leakage while baking), just the right amount of bread-to-filling ratio and a totally unique and cool way to get the pizza rolls to pull apart without spending hours stuffing little balls of dough with pizza fillings.
Yep. They are perfect.
We’ve eaten this tested-and-perfected recipe several times over the last month or so.
They make for a lovely dinner served with a green salad and fresh fruit and vegetables, and they would also be great for an appetizer or snacky get together. Speaking of which, I love snacky get togethers, don’t you?
Have you seen all those quizzes/profiles going around Facebook that tell you what state you are or what Disney character you are or what kind of cookie you are or what natural disaster you are (oh wait, maybe that wasn’t actually one…)?
I’ve never taken one because I’m kind of scared of the results but if they had a quiz for what kind of party you are, I’d be the snacky get together.
I’m sure of it.

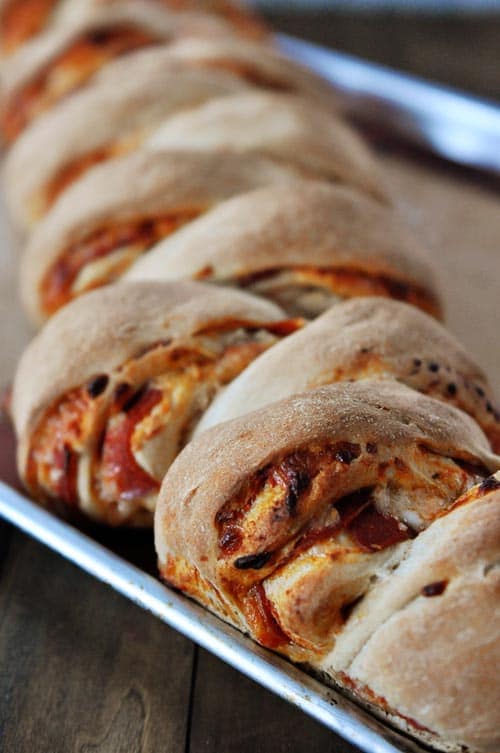
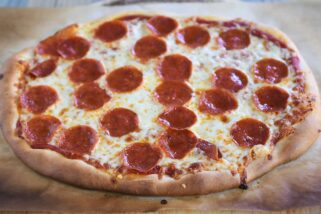
A special thanks to my 9-year old, Jackson, for taking one for the team and pulling apart the piping hot pizza rolls for the action shot.
He earned himself the privilege of sampling the pizza rolls before dinner, lucky kid. Pays to be the offspring of a food blogger.
Oh, and don’t forget to check out the simple, quick step-by-step photos below!
What to Serve With This
- A really great, green salad like this Spinach Salad
- Buttery Peas with Thyme or steamed vegetable like broccoli or peas
- Fresh, seasonal fruit
One Year Ago: How to Cook Perfect Brown Rice
Two Years Ago: Chocolate Nutella {2-Minute} Mug Cake
Three Years Ago: Chicken Pot Pie Crumble

Whole Wheat Pizza Pull Apart Rolls
Ingredients
Dough:
- 1 ½ cups warm water
- ¾ tablespoon instant yeast
- 2 tablespoons granulated sugar
- 2 tablespoons canola or vegetable oil
- 1 teaspoon salt
- 4 cups white whole wheat flour, approximately
Filling:
- ½ to ¾ cup pizza sauce
- 4 ounces turkey or regular pepperoni
- 2 cups mozzarella cheese, shredded
- ⅓ cup finely shredded Parmesan cheese
Instructions
- For the dough, in the bowl of a stand mixer or in a large bowl by hand, combine the warm water, yeast, sugar, oil, salt and 2 cups of the flour. Begin mixing and continue to add the rest of the flour gradually until the dough has pulled away from the sides of the bowl. Judge the dough by how the dough feels and not by the exact flour amount – you may have to add more or less depending on a variety of factors (see a tutorial on working with yeast here). The dough should be soft and smooth but still slightly tacky to the touch. Especially because this recipe calls for all whole wheat flour, overflouring the dough will make dense, tough rolls so err on the side of underflouring because you can always add more flour later.
- Knead the dough in the stand mixer or by hand until it is very smooth and elastic, about 7 minutes in a stand mixer or 10 minutes by hand. Lightly spray a large bowl with cooking spray and place the dough in the bowl. Cover the bowl with lightly greased plastic wrap. Let the dough rise until it has doubled (this usually takes about an hour).
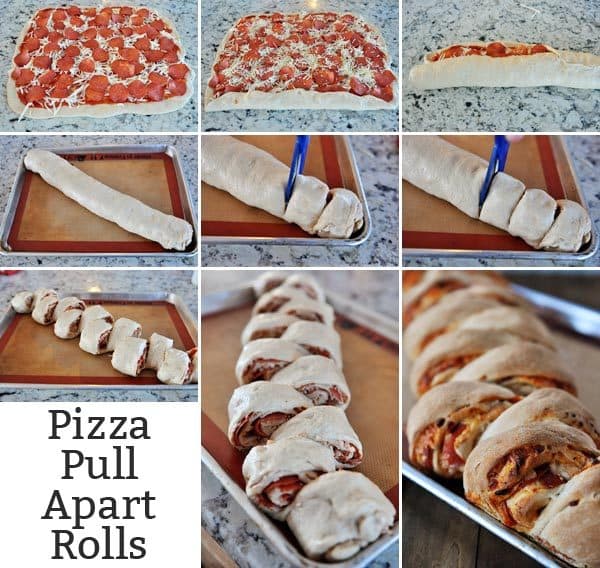
- Gently punch down the dough and press it out on a lightly greased counter to a 17X14-inch rectangle.
- Spread the pizza sauce evenly across the top, leaving a border on both of the long sides. Sprinkle with the mozzarella cheese, layer on the pepperoni, and sprinkle on the Parmesan cheese.
- Beginning with one of the long edges, roll the dough up cinnamon roll style, trying to keep the roll as tight as possible. Pinch the seam to seal.
- Carefully lift the roll and place it seam side down diagonally on a lined (parchment or silpat) 12×18-inch baking sheet. Using a clean pair of scissors, cut a slice almost down to the bottom of the roll (don’t cut all the way through!) every inch or so the length of the pizza roll (see the setp-by-step pictures below). Gently pull the slices to alternating sides down the length leaving that little bottom portion of dough intact so the rolls are not completely separated.
- Let the rolls rise, uncovered is fine, until slightly puffy, about 20-30 minutes. Preheat the oven to 400 degrees toward the end of the resting time.
- Bake the pizza rolls for 18-22 minutes until they are golden on top and the bread is baked through. The filling will be hot and bubbly.
- Let the rolls rest for about 5 minutes before pulling apart and devouring. Dip the rolls in extra, warmed pizza sauce, if desired.
Notes
Recommended Products


Recipe Source: from Mel’s Kitchen Cafe (cutting method inspired by this post about cinnamon rolls)


Might want to update the prep time for this. I’m seeing the dough takes about an hour, and then another 30 for the second rising and then 22-30 for baking. Way more than the 25 minutes/47 minutes total time.
Will do!
Ok so I know this recipe was posted a couple years ago but I finally made it. And it would be delicious except I couldn’t get it to cook all the way thru…. It was quite brown on the top but still doughy most of the way thru the middle. I baked it for close to 30 minutes. And like I say it was pretty brown on top. The only thing I would have done differently than you was use some different toppings. Part of it I did traditional pepperoni, then part plain cheese and part ham and pineapple. Do you think I put too much pizza sauce on it? Or maybe the ham and pineapple was too juicy? The pepperoni side seemed slightly better but was still doughy. It was leaking juice even before I baked it and while it was baking and I tried to wipe some of it up. I maybe could have pulled each roll a little farther to each side but it was actually doughy all thru the roll too?!? It was still yummy as my 3 year old and I don’t mind a little dough but my husband really had to pick around on it. Any ideas for me because it really was good if I could get the dough factor figured out!! 🙂
Hey Janelle – you might try turning the oven down by 25 degrees and cooking it longer. Every oven is a little different temp wise and if yours cooks on the hotter side, the outsides will get done before the insides. Also, I do think the pineapple will make the dough much softer and maybe a little soggier – often, I’ll pat the pineapple dry with a paper towel before using. Hope that helps a little!
I just made these with a vegetable filling (red and green peppers, olives, mushrooms) and because we don’t have white whole wheat flour in my adopted country, about half regular whole wheat flour and half all purpose– turned out great!– but probably due to half all purpose flour, the dough was too soft to pull apart into sections. So, I made the one large roll and cut the slices just like in the picture (without pulling them apart), then left it like that to rise for the 20 minutes and then baked it for a bit longer than the recipe. Delicious and a fun variation for Friday pizza night. Thanks, Mel!
Have you ever prepared the pizza rolls up to thebake stage and then refridgetated them to finish off later? I am a crazy busy working mom so i mass produce food once a week to bake throughout the week.
Yes, it works great. 🙂
Good day I am so grateful I found your site, I really found you
by accident, while I was looking on Askjeeve for something else, Anyhow I am
here now and would just like to say kudos for a fantastic
post and a all round enjoyable blog (I also love the theme/design),
I don’t have time to look over it all at the minute but I have bookmarked
it and also added your RSS feeds, so when I have time I will be back to read more, Please do keep up
the fantastic work.
This is the third time I have made this exact recipe. I just love how wonderful it looks and how easy it is. I like that whole wheat dough for a more nutritious dinner. My kids love it and my hubby devours it. What a great recipe. 🙂
Seriously delicious! Just made this last night and finished off leftovers for lunch! I’ve attempted stuffed bread recipes previously and had problems with cooking evenly. Genius idea about cutting a slit in it and alternating them. I have all kinds of ideas of what can be stuffed in this. Thanks for this fabulous new recipe!
As with all your recipes this was a delicious hit with my whole family! What a nice change up from traditional pizza for our family night – I will definitely add this to my meal rotation!
Hello, I have a question, could I bake this as a log only or do I really need to cut it?
Jocy – Sure – although you might need to add time to the baking since it will need to cook through without having the rolls pulled apart beforehand.
This turned out great! I adjusted it a bit (used homemade sausage, bell peppers and mushrooms instead of pepperoni) and we enjoyed it. Thanks for the recipe.
It is so nice to know we can incorporate healthier things (like whole-wheat) into things that are not as healthy! Great idea!
I made these last night and they were delicious! The only problem was that some of the inside dough wasn’t cooked all the way, even though the outside was brown and crusty when I took it out of the oven. Have you had this problem? What suggestions do you have for making sure all the dough gets cooked all the way through?
Thanks!
Hi Leisa – hmmm, I’m not sure. I haven’t had that problem – especially because they alternate to each side so the hot air should actually bake them through pretty well. Do you think you could pull them to each side even more? Don’t be afraid to add baking time since each oven can vary in exact temperature.
Thanks for the recipe, these turned out great! I substituted thinly sliced mushrooms and red peppers for the pepperoni, and managed to squeeze the whole batch of dough into one tray. I also let them rise in the oven as it preheated and they turned out beautifully 🙂
I just made these tonight for dinner and they were a HUGE hit! My husband and son really loved them, and it was a super easy and quick recipe to throw together. I used 1/2 whole wheat flour and 1/2 all-purpose, I think next time I’ll get the white whole wheat. This is going in my regular rotation. Thanks Mel!
Hi Mel! I hate to go off topic here but I scored a great deal on large red bell peppers but I can’t find a stuffed pepper recipe anywhere. Do you have a tried & true stuffed pepper recipe? Thank you so much for helping me nourish my family in a practical way!
Army of 7 – I have to confess, stuffed peppers aren’t my most-craved meal. 🙂 In fact Brian and I both aren’t huge fans so I’ve never really explored a tried-and-true recipe. Sorry I’m so lame. 🙂
I enjoy your blog so much and have tried some of your recipes, most recently the delicious chocolate chip coconut cookies. However, I am having difficulty printing out the recipes. I am not on facebook or twitter, so I signed up with my email address. At first, I was able to print the recipes I wanted to try, but now I cannot. I did sign up to save to Zip List, but I cannot print from there and wonder if signing up there has somehow messed with my email. I’m sure you can tell I’m not very techie. Would appreciate your insight and any suggestions. Thanks.
Hi Mary – thanks for the comment! If you are using Internet Explorer, the print function isn’t working right now. I am working to get it fixed but in the meantime, I’m encouraging those who are having issues to switch to a different browser like Chrome, Safari or Firefox. Internet Explorer has issues with many website functions and one of those other browsers will be much better (not just for the print function). If you don’t want to switch browsers, know that I am working on it but am not sure when there will be a fix available. I’m sorry for any inconvenience!
I’ve been using your blog as a resource for recipes since my sister sent me the recipe for your creamy chicken and wild rice soup! Thank you for the great recipes and new ideas. I love trying your recipes because I know they will be GOOD and my family will eat them!
Fun! We are going to make these Friday (our regular pizza day)!
I’m soo making these this weekend. And of course, I voted for you. You have the best blog ever!!
I will be making these tomorrow for my grandson to stuff in his face with his pudgy little hands 🙂
The stars were aligned and had some of your pizza dough in my freezer and some of your pizza sauce in my freezer as well. Felt so great to see this post and be able to quickly and effortlessly pull together a fun and delicious dinner for my family tonight. Thanks for saving our dinner once again!
oh i love this! a twist from making a pizza! thanks!
Hello mouth-watering yumminess! I didn’t even need to read the post, the pictures alone convinced me to make this now!
I have never commented on your blog or any other, but wanted you to know that I voted for you today. You inspire me, even though I am old enough to be your mother and have been cooking for many years. I am currently cooking for a multi-generational household with ages ranging from 3 to 88. I use your recipes frequently and every one has been a hit with all ages. I am so hoping you win!
You need to know I would not just make an account for anyone, but I did for you. I had to get my vote in, darnit. 🙂 Thanks for making my life easier and for helping my husband think I’m a fabulous cook. Life changing stuff, I tell you. Your bourbon chicken is like crack. I mean that in the best possible way. 😉
Made these this morning, before the second rise I placed them in the refrigerator and pulled them out about 1 hour and 30 minutes before cooking. Perfect dinner. Thank you.
(I voted – happy to vote your blog is AWESOME!)
Oh baby! This is “puffing” and getting ready for the oven as I type! I used part whole wheat and part all-purpose flour for the dough. Right now my whole wheat flour is store bought and is red wheat. It tends to be more dense and dry, so I usually use at least a small portion all-purpose with it, to lighten it up. I also added some sliced mushrooms to the pepperoni. Can’t wait! 😀
SO voting for you! You’re my favorite 🙂
I want to eat this immediately.
Voted!! Whether you win or not, my friend, you are the very best! Your new non soggy French bread pizza is on the menu for Saturday for a get-to-together with friends. I thought the kids (and adults) would have fun making their own pizzas and sundaes. This tutorial is wonderful and will be much needed when I attempt this recipe. Sure wish I could have voted for you “a million times:. 🙂
I had a touch of the mondays… And thought to myself, “Maybe Mel will have something to cheer me up.” You came through again. Who doesn’t like a new way to eat pizza?
I voted, because you’re my friend (What? We’ve never met?). Okay, imaginary friend. And because I adore your blog more than all other blogs. Ever.
And you’re totally SMOKING the competition currently… Which made me cheer… And then hope I didn’t wake my sleeping baby 🙂 Good luck!
Thank you for the great recipe, could this be made with whole wheat flour instead?
Paola – you could use other types of whole wheat; I prefer white wheat because it’s a bit lighter in texture and taste. Hard red wheat flour will produce darker (and maybe denser) dough but you could definitely use what you have or prefer.
Thanks, Mel!
Wondering what your thoughts are on making this ahead of time. Could I prepare this the night before for dinner the next night?
Hi Lynn – I think this could definitely be made and shaped ahead of time. I’d probably cover with greased plastic wrap and refrigerate (before letting it rise the 2nd time right before baking) and then pull it out an hour before baking. Haven’t tried it but should work just fine!
I am so making these! 🙂
My favorite recipes are from you! Can you give tips on making yummy things like this for a GF diet? Still struggling to make a good pizza dough with my GF blends. Appreciate your GF recipes so much!
Hi Cheryce – thanks for your comment! Unfortunately I am far from an expert in the gluten-free bread making world but my friend Nicole has a great looking gluten-free pizza dough recipe on her blog here:
http://glutenfreeonashoestring.com/grilled-gluten-free-pizza/
I hope that helps!
Yum, these look fantastic!
Look delish! I was wondering, could you freeze these, like for a quick pull-out-of-the-freezer-and-throw-in-my-kids’-lunch option?
Hey Hilary – I haven’t frozen these myself but think they could be easily baked, cooled and frozen for a quick reheat lunch/dinner option (or throw them in school lunches!).
They look amazing Mel! I’m all about anything pizza. That oozing cheese looks like perfection!
This looks great! We like pizza in every form at our house 🙂
Plus, I voted and wanted to mention that I created an account to do so. It was really easy, and I didn’t select that I wanted to receive any emails from them, so I don’t think that making an account will result in annoying emails!
Looks delicious! I bet it would be tasty to brush the top of the dough with maybe an olive oil-italian herb mix before baking too, I’ll have to try it 🙂
Yum!! And voted 🙂
Looks good!!! I VOTED!!!!
These look so delicious! Thank you for perfecting the recipe for us, and thank you to Jackson for taking one for the team so you could snap that awesome photo! I am definitely a snacky get together person. Some of best parties have been appetizers only- lots and lots of appetizers!
Congratulations on your blog nomination! I am off to The Kitchen to vote for you!
Will definetely have to try this!